When laying out the plans for a fresh build or updating your present ride, it’s always a good idea to try and establish performance goals before getting started. It’s nailing down a budget to work within to be able to score the best technology available. It’s also important to make the determination if you want to have a tame boulevard cruiser, hopped-up Saturday night special, or an aggressive cone-carver. Any way you look at it, if you want to put down the power, you’d better have a rock-solid base to work with, starting with suspension, steering, and braking.
On a recent visit to Procision Industries in Taunton, Massachusetts, we met up with shop owner Pat O’Brien who had recently purchased a 1971 Camaro project. The stripped roller had been blasted clean and coated in epoxy primer to prepare it for the next journey. When talking with O’Brien about the build, his main goals were to create an affordable LS-powered second-gen that could hold its own on the street as well as the autocross while not breaking the bank in the process.
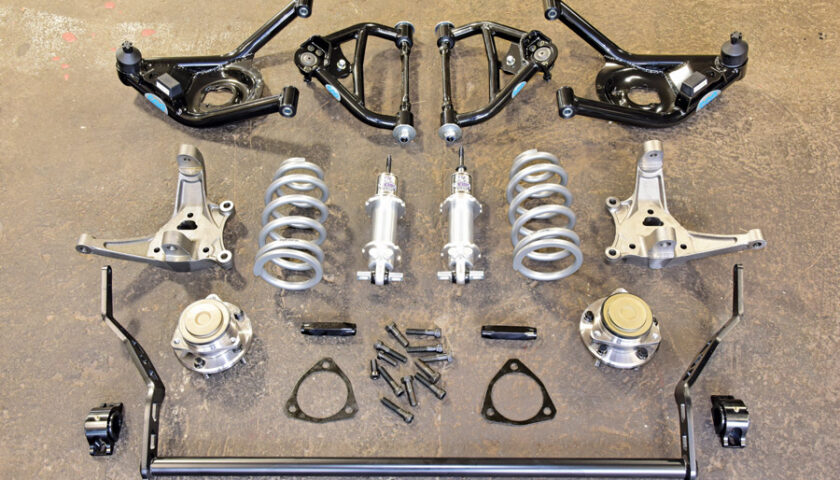
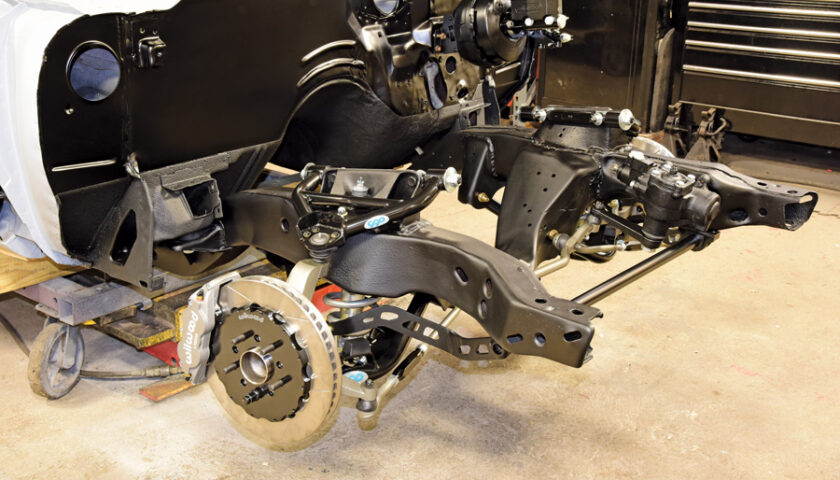
It was a perfect opportunity for All Chevy Performance to follow along on the build, starting with a complete rebuild of the front suspension, brakes, and steering to bring the car to the next level. One call was all it took to Classic Performance Products (CPP) to check out their new Pro-Touring kits featuring cutting-edge performance at an affordable price. They’re available in a number of different stages, showcasing well-defined upgrades for front suspension (Stage I and II) to full kits for front and rear suspension (Stage III and IV) depending on your particular needs. In this article we’re focusing on the Stage II kit, which utilizes the factory subframe to bring newfound handling to the original bones.
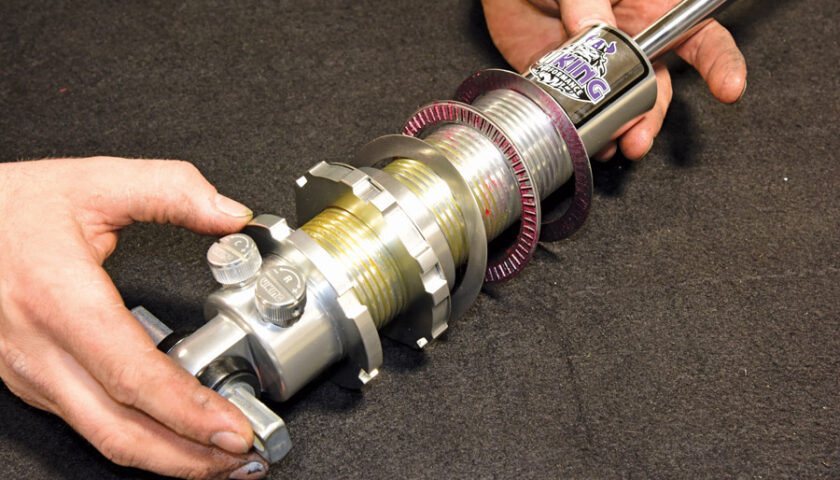
Packing the kit with all the right goods, CPP raised the bar with their Totally Tubular upper and lower control arms deftly matched to Viking Performance double-adjustable coilover shocks with lowered coil springs. O’Brien then updated the kit with their latest high-clearance front adjustable sway bar featuring a beefy 1¼-inch bar, precision laser-cut 3/8-inch legs and heim-joint endlinks matched with their Corvette-style spindles, high-performance C7 wheel hubs, and fresh MOOG steering components.
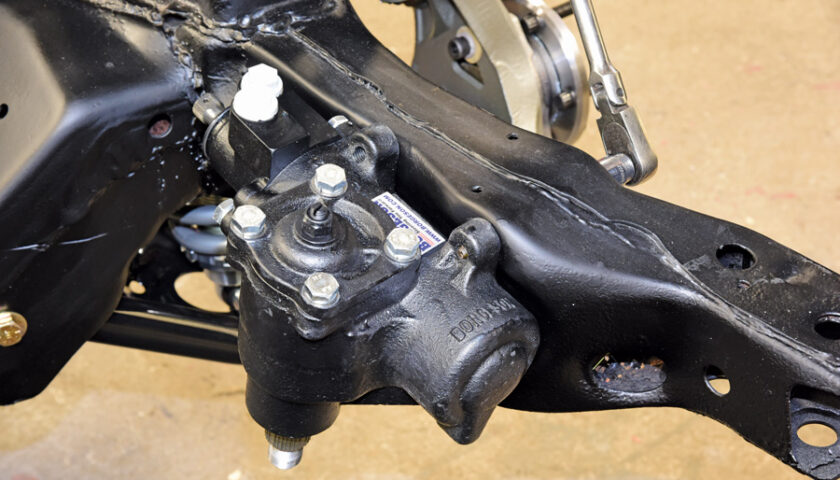
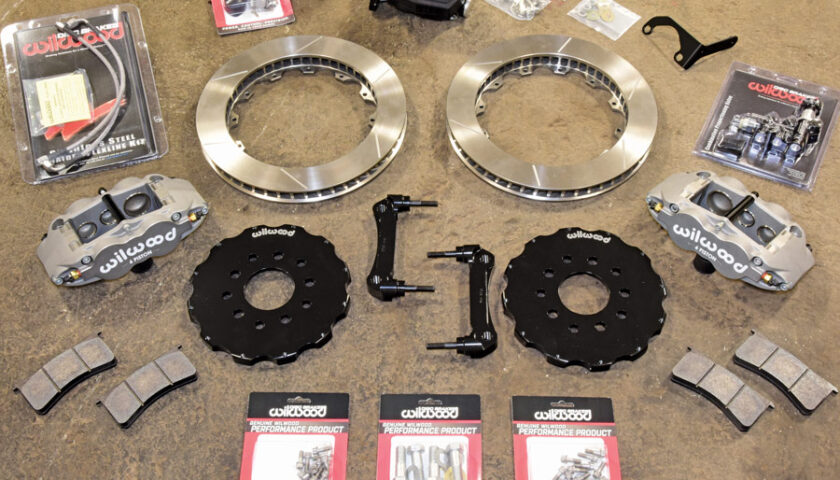
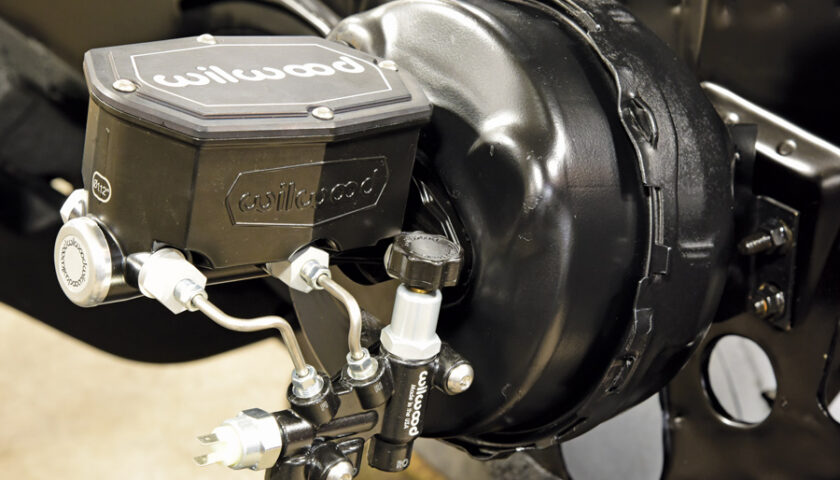
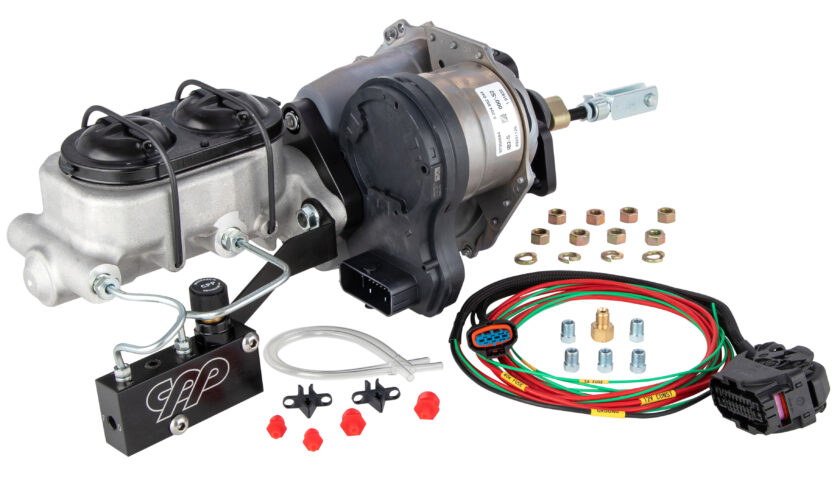
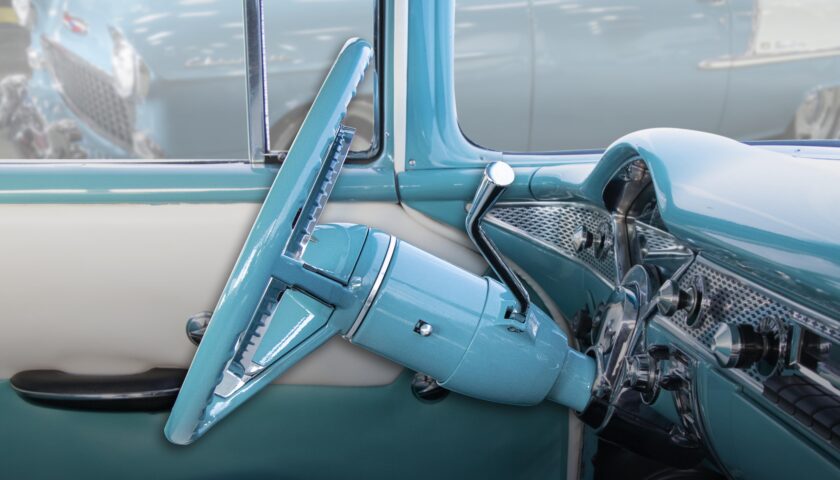
For the ultimate in stopping power he opted for Wilwood Engineering’s Forged Narrow Superlite 6R Big Brake front brake kit complete with Forged Narrow Superlite 6 Radial-Mount six-piston calipers and GT Slotted rotors. To complete the package, their Compact Tandem Master Cylinder with combination proportioning valve was a perfect match to the factory power brake booster. The final link to complete the upgrade was Borgeson Universal’s Street & Performance Series 12.7:1 quick-ratio modern power steering box that bolts directly into the factory location.
Let’s follow along as O’Brien brings plenty of newfound handling and braking to this second-gen Camaro.
Look for the rear suspension and brake upgrade on this Camaro in the Mar. ’21 issue of All Chevy Performance magazine.
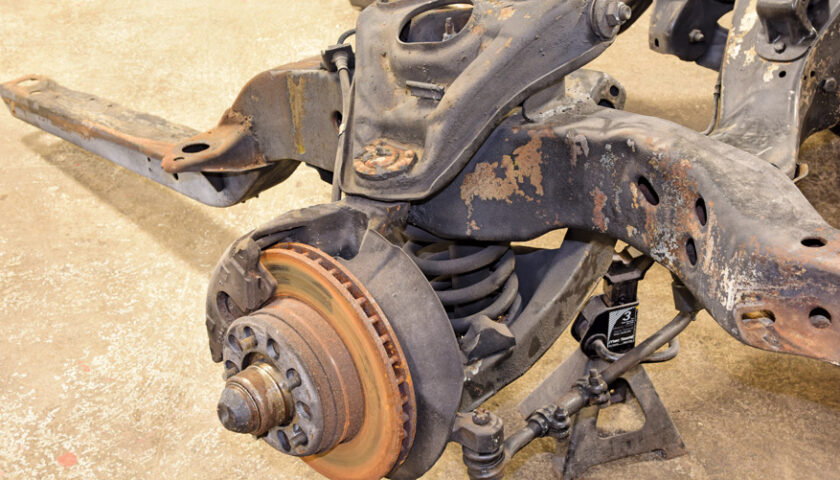
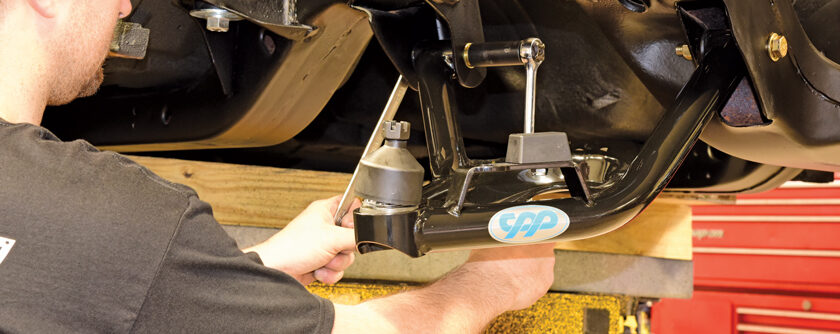
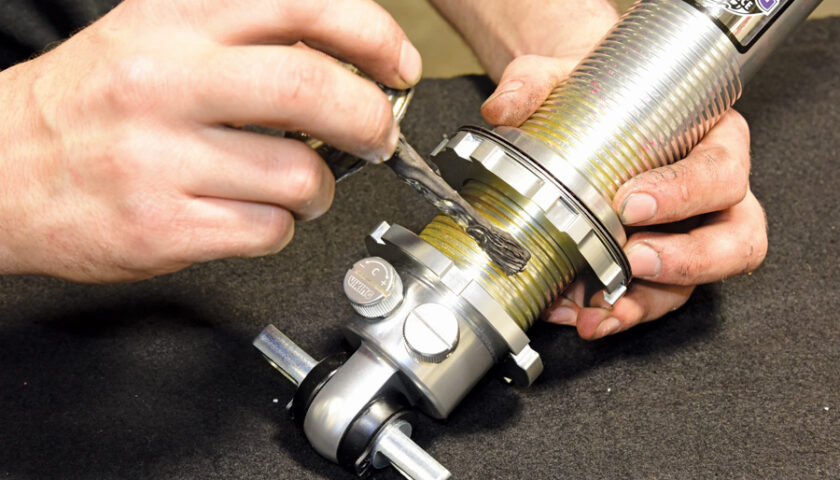
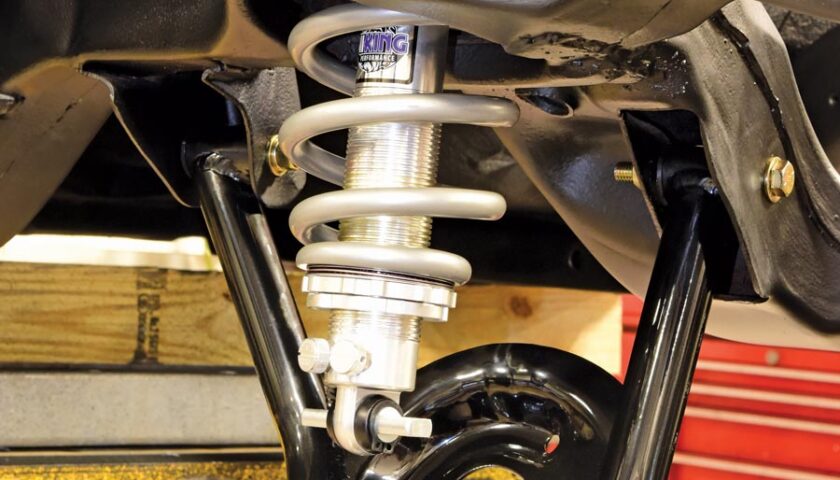
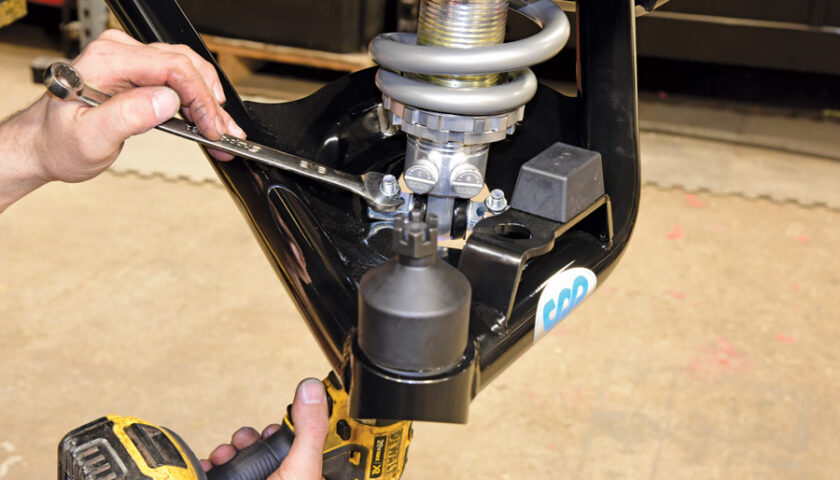
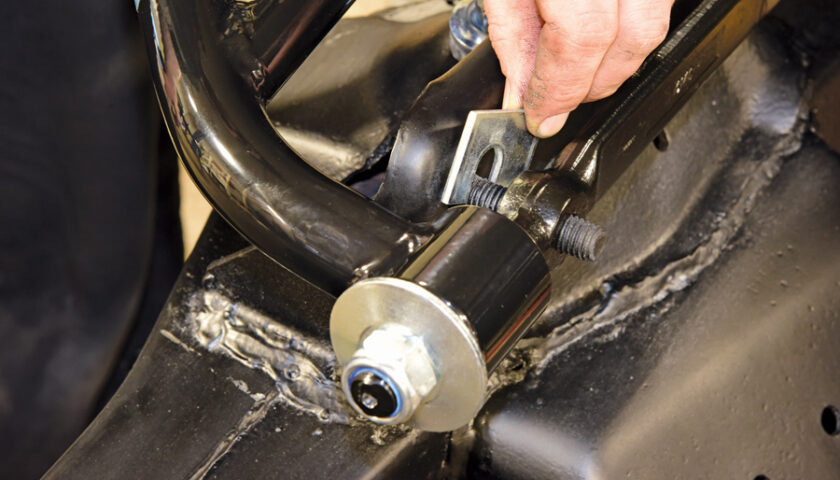
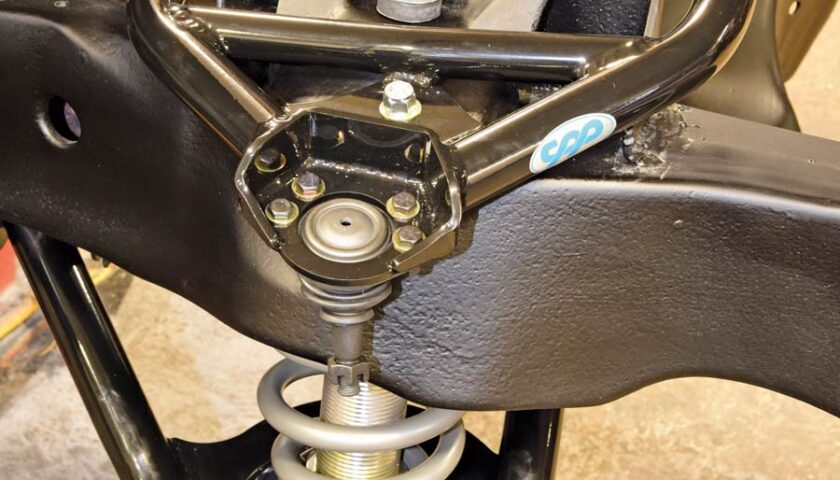
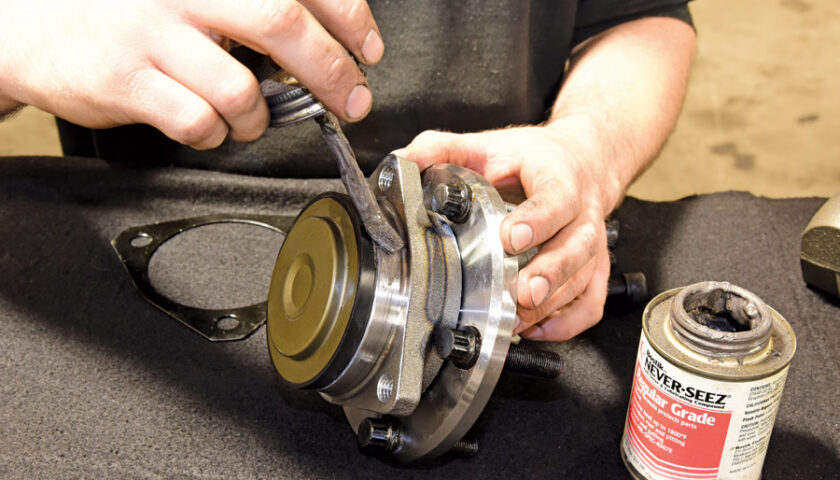
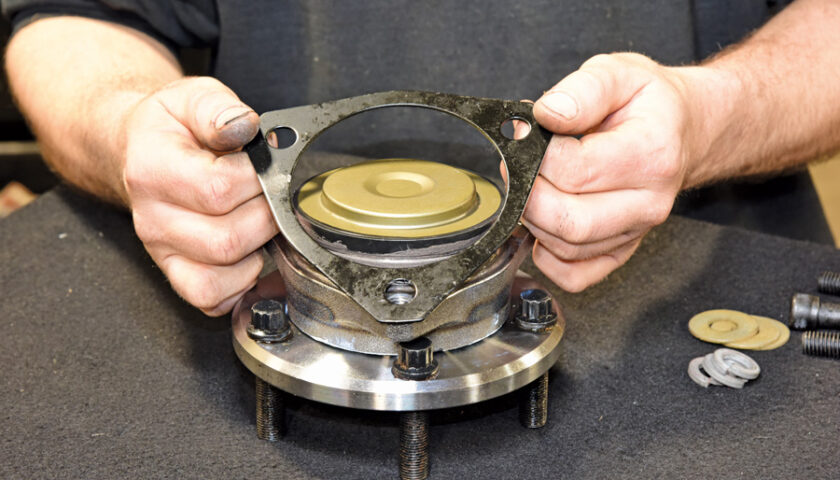
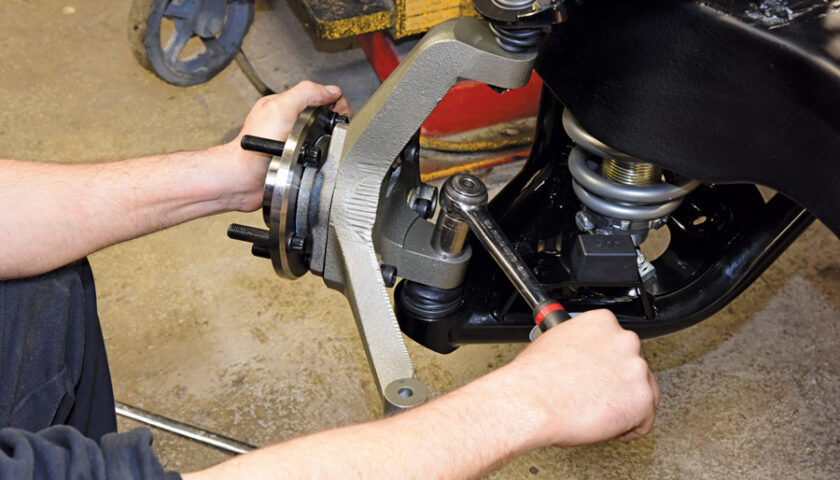
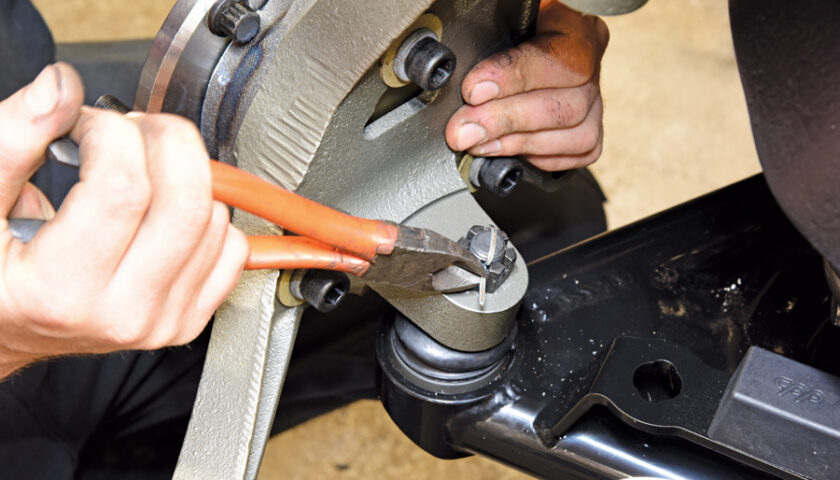
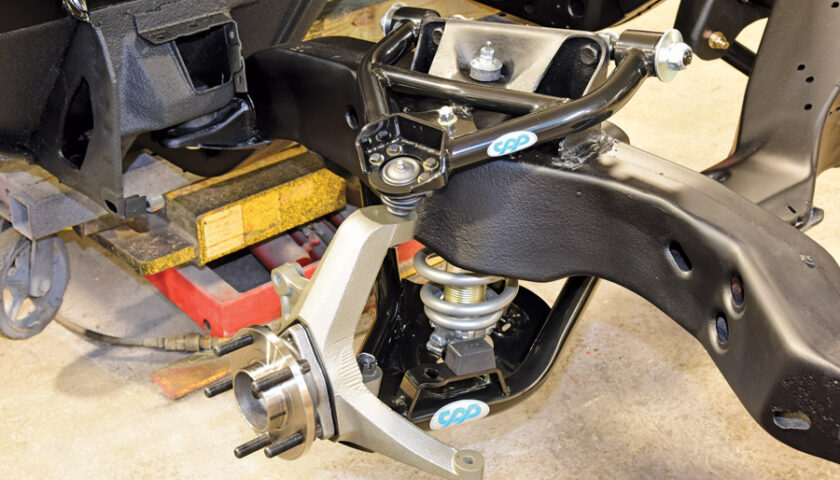
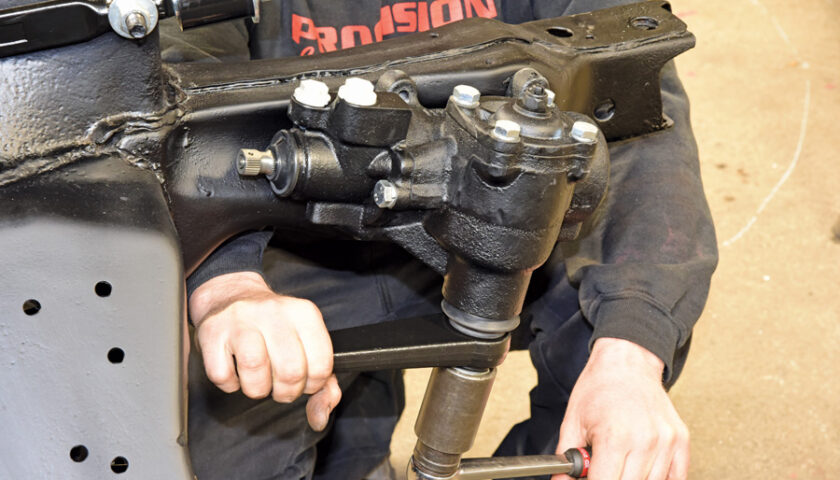
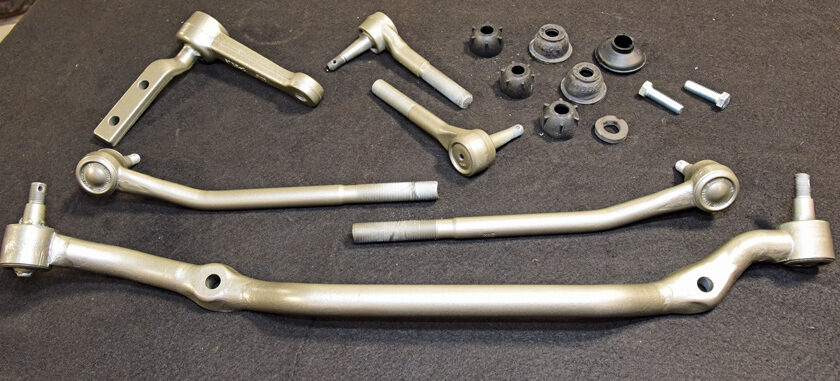
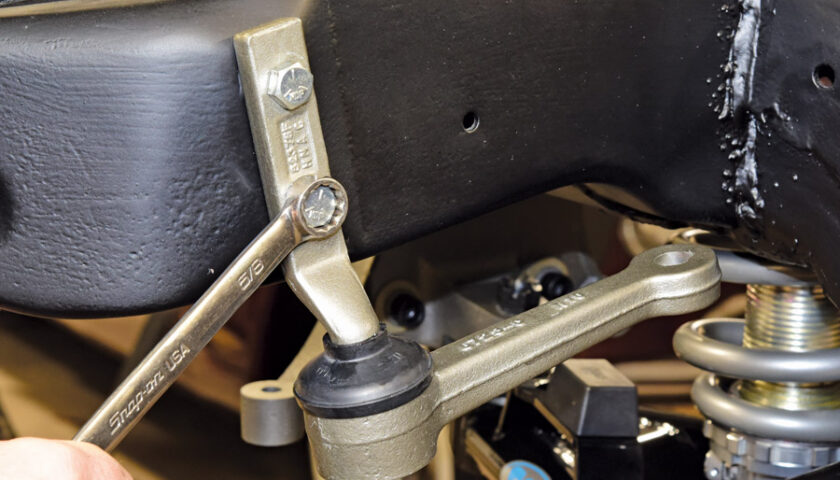
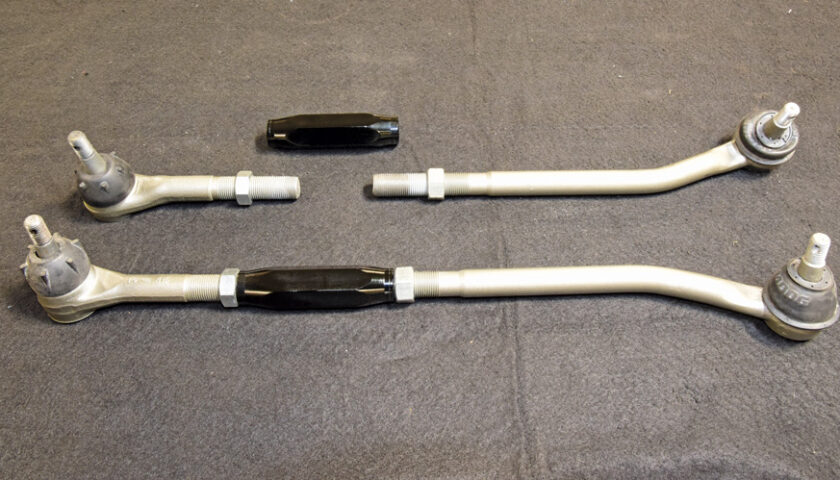
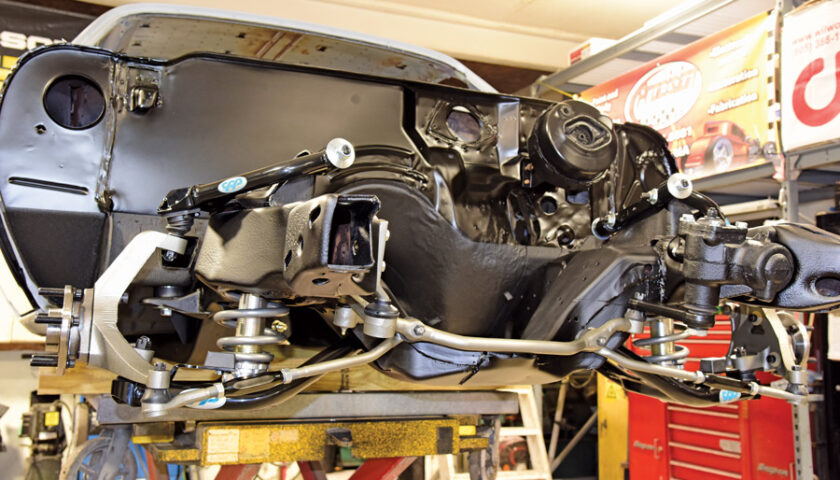
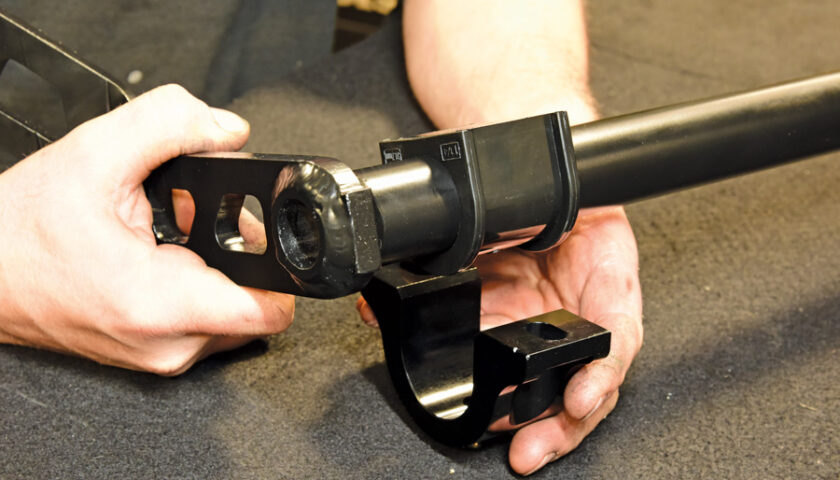
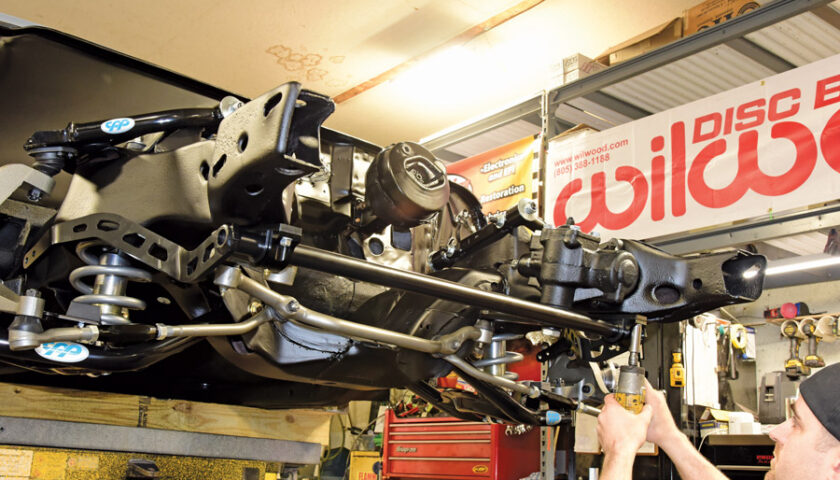
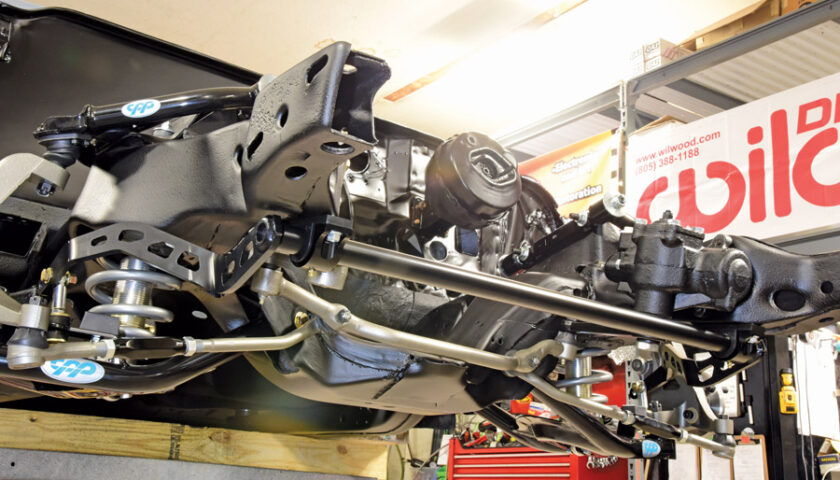
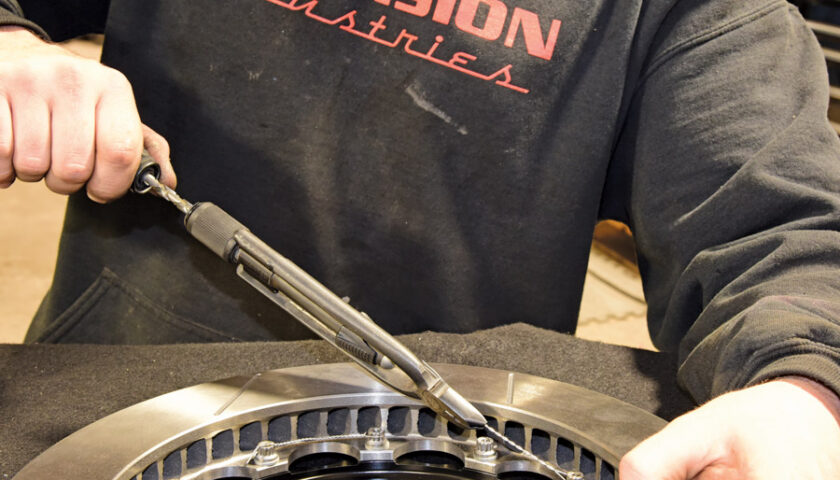
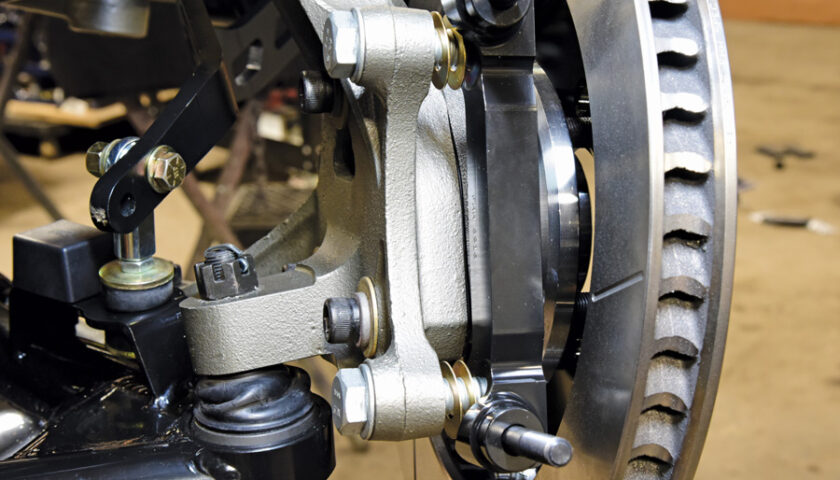
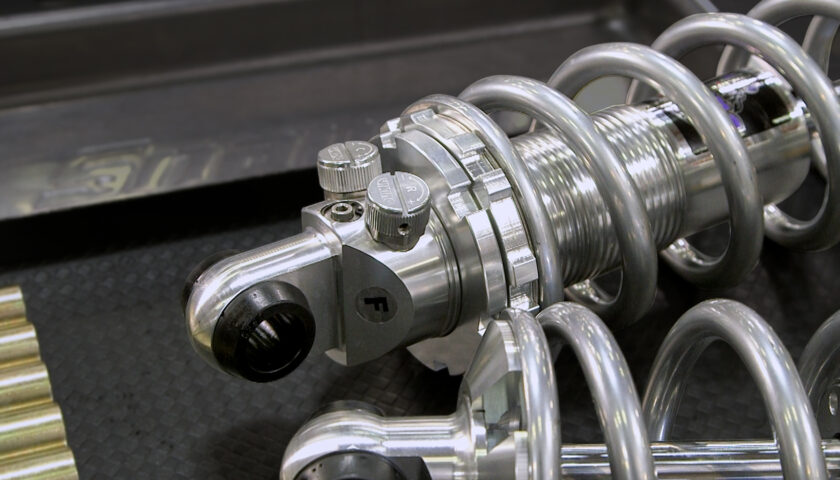
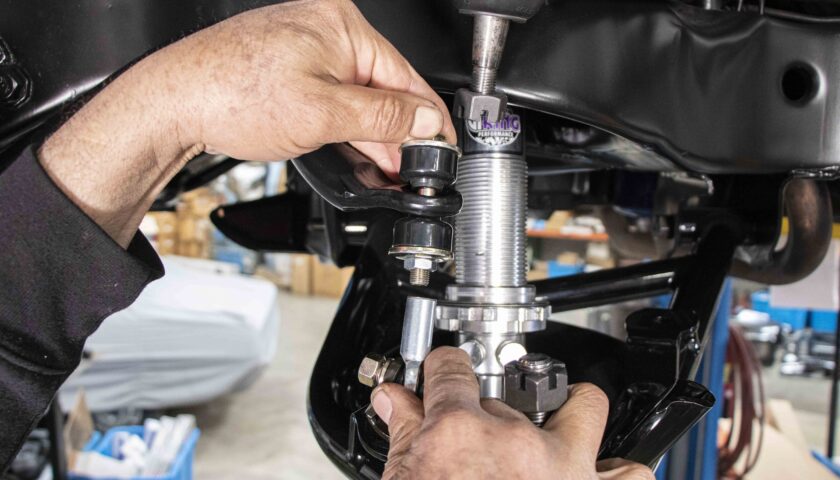
1. Here’s a closer look at the crusty and outdated original IFS from the 1971 Camaro showing decades of abuse, leading to deteriorated handling and braking capabilities.2. Classic Performance Products (CPP) offers an excellent solution to add razor-sharp handling to your 1970-1981 Camaro with their Stage II Pro-Touring kit. It arrives packed with all the right bits to update your front suspension with fresh, cutting-edge components. We’ve even included their Corvette-style spindles, high-performance C7 wheel hubs, and upgraded high-clearance, adjustable front sway bar.3. With the original subframe blasted clean, epoxy primed and treated to a coating of satin black, Pat O’Brien of Procision Industries in Taunton, Massachusetts, started assembly by first installing the CPP Totally Tubular lower control arms (properly lubricated with high-temp wheel bearing grease) with the provided Grade 8 hardware.4. Viking Performance double-adjustable coilover shocks are included in the kit. To start assembly with the piston rod extended, thread the lock nut (shoulder up) and spring nut (shoulder up) down to the last thread. The Viking thrust bearing kit was then set in place for plenty of ease in adjustment with the spring seat washer first, followed by the bearing and finally the second washer. Both washers were coated with antiseize lubricant.5. A liberal coating of antiseize lubricant was then applied to the threads of the shock body to prevent galling.6. Next, install the lowered coil spring onto the shock, putting the small end of the spring over the shock body and onto the spring seat. Follow by installing the upper stud bushing, washer, and nut. Tighten the nut until the bushing od matches the washer od, then lock down the jam nut.7. Mount the coilover shock base to the lower control arm with the provided hardware and tighten.8. The CPP Totally Tubular upper control arm was then installed along with the provided camber alignment shims and tightened.9. Here you can easily see the difference in the upgraded suspension with the completed upper and lower Totally Tubular control arms and Viking Performance double-adjustable coilover shock in place on the factory subframe.10. The bearing side of the high-performance C7 wheel hub was coated with antiseize lubricant to ensure ease of assembly.11. O’Brien followed by then installing the shim onto the spindle.12. Using an impact gun, the C7 hub was then mounted to the Corvette-style spindle using the provided bolts (coated in Loctite Blue threadlocker) and washers. Note that O’Brien prepped the new spindles by first cleaning them with prep solvent and followed with a coating of etching primer, completing them with Duplicolor Cast Coat Iron for a clean factory look. 13. The hub/spindle assembly was then mounted to the factory-installed ball joints of the Totally Tubular upper and lower control arms with the provided castle nuts and tightened into place.14. The upper and lower castle nuts then each received a cotter pin, which were aligned and secured.15. With the completed assembly mounted in place, the hub-to-spindle bolts were then torqued to 96 lb-ft. It’s easy to see the vast performance improvements for the front suspension, which will translate to an entirely new level of handling.16. When upgrading the factory suspension, a Borgeson Universal 12.7:1 quick-ratio power steering box provides a critical link to bring it all together when replacing the tired factory unit.17. With the new steering box secured to the original mounting area on the stock subframe, O’Brien followed by installing the new Proforged E-Coated Pitman arm from Summit Racing.18. There’s nothing better when updating your front suspension than adding fresh steering components to tie it all together. CPP provided everything needed from MOOG, including steering center link, idler arm, and inner and outer tie rod ends. O’Brien gave everything a coating of Duplicolor Cast Coat Iron for added protection.19. To get started, a dust boot was added to the idler arm assembly and the unit was secured to the subframe using a 5/8-inch wrench.20. CPP’s adjustable black aluminum tie rod sleeves were a perfect complement for the MOOG upper and lower tie rod ends, pictured here with dust boots installed, ready for installation.21. This image lets you see how wicked the completed CPP Pro-Touring front suspension installation looks with added parts from MOOG and Borgeson tying it all together.22. We decided to upgrade our kit with CPP’s new high-clearance adjustable front sway bar. Once the adapter brackets were mounted to the subframe, the POLYPLUS bushings were added to the bar along with the billet mounting bracket.23. O’Brien then bolted the unit to the frame.
24-25. Finally, the POLYPLUS adjustable endlinks were secured to the lower control arm mounting points to complete the installation.
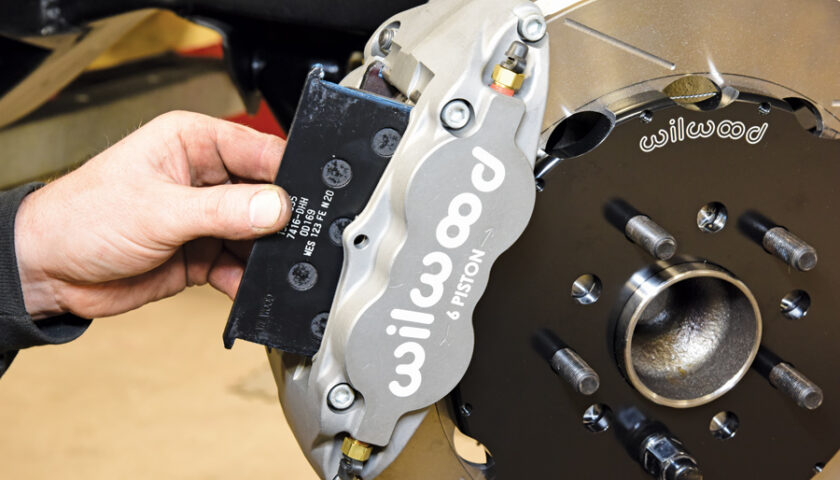
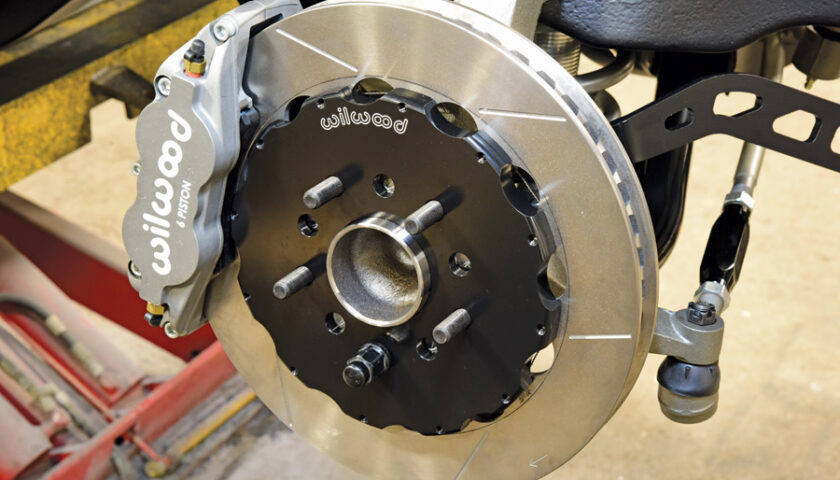
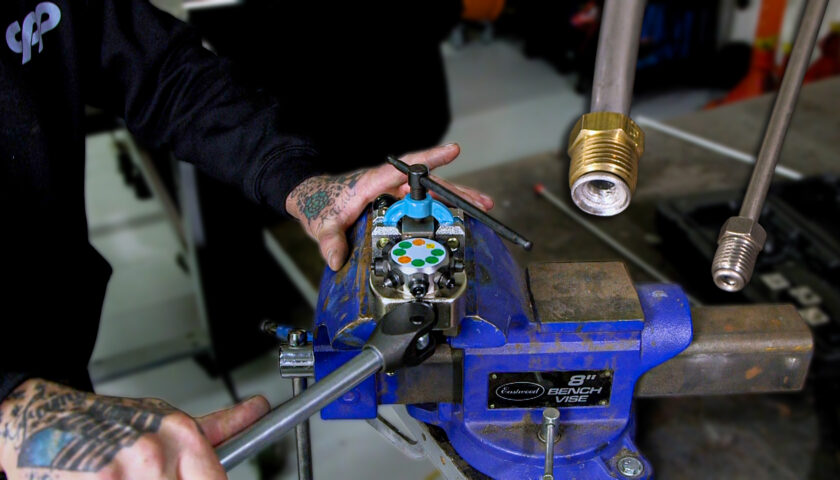
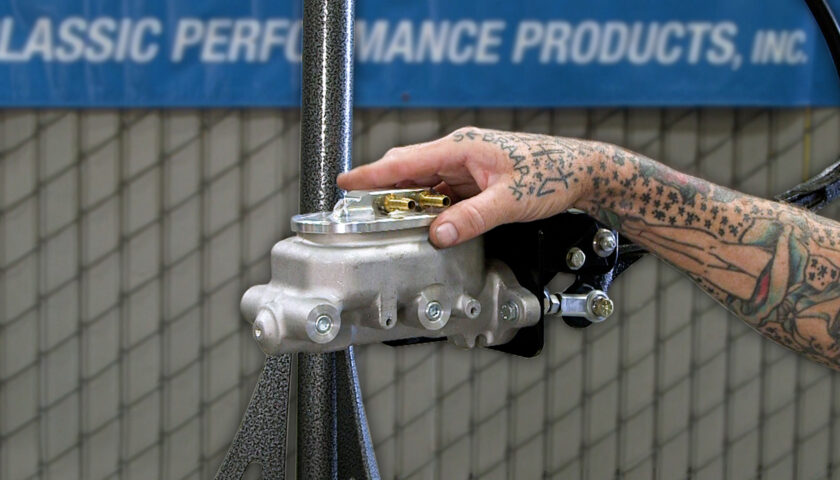
26. For incredible stopping power, O’Brien selected Wilwood Disc Brakes Forged Narrow Superlite 6R Big Brake front brake kit complete with Forged Narrow Superlite 6 Radial-Mount six-piston calipers in Type III hard anodized finish. To conclude the install, he picked their Compact Tandem Master Cylinder with combination proportioning valve, mounting bracket, and Flexline Kit.27. When assembling the GT slotted rotor to the hat with the provided hardware, it’s important to apply a coating of Loctite 271 (red) to all the threads and then hand thread the bolts in place. Follow by tightening them with an impact gun in an alternating sequence. The bolts were then safety wired using standard stainless steel wire for added security.28. The completed rotor assembly was then slid onto the hub and secured in place. The caliper mounting brackets were then mounted to the spindles with threads receiving a coating of Loctite 271 (red). Note that two shims were installed on both upper and lower mounting points between the bracket and spindle prior to final tightening.29. When mounting the caliper to the bracket, be sure to center the caliper onto the rotor for proper alignment. Follow by installing the brake pads to the caliper with the included hardware.30. The completed install of the new Wilwood Forged Narrow Superlite 6R Big Brake front brake kit not only looks great, it will give the Camaro an amazing increase in braking capabilities once it hits the street.31. Assembling the Wilwood Compact Tandem Master Cylinder with combination proportioning valve was a snap, especially with the mounting bracket kit and ready-made lines.32. To complete the brake updates, the new master cylinder was mounted to the power brake booster 33. With the front suspension install complete and looking tight, we’ll follow up with the rear suspension install in the next issue of All Chevy Performance.